Tuesday 31 January 2017

Soft warm alpaca quick to make scarf

It's winter time here in Norway, and I suddenly realized I had no really warm scarfs, so I decided to make myself one. After looking through all my yarn baskets without finding enough of any single colour, I decided to make it a triple coloured scarf. I think it turned out really well 😊
I used really big knitting pins, which made me finish it in 2 evenings watching television. Do you want one too? Here is how I made it.
What you need:
1 pair of knitting pins size 15 - 3 different colours alpaca yarn, apx 75 grams of each - 1 wool needle to secure the ends.
I used this yarn: AdLibris alpakkagarn which is 125 m per 50 gr bundle.
These colours: Dusty blue - Dusty pink - Off white


Step 1. Use one thread from each colour throughout your work. Cast on 20 stitches.

Step 2. Work rib = K 1/P 1 until you have reached your desired length.Mine is 170 cm.

Step 3. Secure the ends firmly.

Step 4. Make tassels by cutting 2 threads of each colour, about 25 cm. Tie them on every other st in each end of the scarf.
Before you know it, you are done, and have a brand new scarf to keep you warm this winter!😄


Crocheted colourful containers for your bathroom

Colours make us happy. That is why I chose bright happy colours for this project. And it definitely livens up my bathroom 😊 Let me show you how to make them.
What you need:
Cotton yarn in bright colours. (Or you may choose white and grey, or whatever you like the most).😉
The yarn I used is 150 m per 50 gr bundle. Crochet hook nr 5 and 6.

SMALL BASKET FOR Q-TIPS 


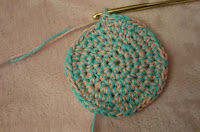
Step 1. Choose 2 colours you like. This one is made with peach and turquoise. Crochet with double yarn, one from each colour, on crochet hook number 5. Make a magic ring. If you don't know how, there's a good tutorial here.

Step 2. Make 6 sc in the ring, and tighten it.

Step 3. Make 2 sc in each stitch = 12 stitches.

Step 4. Make 1 sc in the first st, then 2 in the second, and so on around the ring = 18 stitches.

Step 5. Repeat step 4 = 27 stitches.

Step 6. Make 1 sc in the first 2 st, then 2 sc in the third st. Repeat all the way around = 36 stitches.


Step 7. Make 1 sc in the first 3 st, then 2 sc in the forth st. Repeat all the way around = 45 stitches.

Step 8. Make 1 sc in each st all way around, and repeat until you have the height you wish.
Mine is 7 cm. Cut the yarn, and pull it through the loop. Secure the ends firmly, Choose whether or not you want the edge folded. Fill it up with Q-Tips or rings or hairbands or whatever you wish. Your small basket is done 😊


DISPENSER FOR COTTON PADS


Step 1. Choose 2 colours you like. This one is made with pink and yellow. Crochet with double yarn, one from each colour, on crochet hook number 5. Make a magic ring. If you don't know how, there's a good tutorial here.

Step 2. Make 6 sc in the ring, and tighten it.

Step 3. Make 2 sc in each stich = 12 stitches.

Step 4. Make 1 sc in the first st, then 2 in the second, and so on around the ring = 18 stitches.

Step 5. Repeat step 4 = 27 stitches.

Step 6. Make 1 sc in each st all way around, and repeat until you have the height to fit your cotton pad tube. I did 21 cm.

Step 7. Make 1 sc in the first st, then 2 ch over the next 2 st, 1 sc, 2 ch and so on for 1 round.

Step 8. Make 1 sc in each st all way around, and repeat twice.= 3 rounds.

Step 9. Cut the yarn, and pull it through the loop. Secure the ends firmly.

Step 10. Make a loop from  the yarn, using chain stitches, and sew it onto the top.

Step 11. Make a twine from the yarn, and thread it through the holes in the bottom.
Shove your plastic tube of cotton pads in the dispenser.
You now have a great looking container for your cotton pads.😊

BIG BASKET FOR WASH CLOTHS


Step 1. Choose 3 colours you like. This one is made with turquoise, green and white. Crochet with triple yarn, one from each colour, on crochet hook number 6. Make a magic ring. If you don't know how, there's a good tutorial here.

Step 2. Make 6 sc in the ring, and tighten it.

Step 3. Make 2 sc in each stitch = 12 stitches.

Step 4. Make 1 sc in the first st, then 2 in the second, and so on around the ring = 18 stitches.

Step 5. Repeat step 4 = 27 stitches.

Step 6. Make 1 sc in the first 2 st, then 2 sc in the third st. Repeat all the way around = 36 stitches.

 Step 7. Make 1 sc in the first 3 st, then 2 sc in the forth st. Repeat all the way around = 45 stitches.

Step 8. Make 1 sc in the first 4 st, then 2 sc in the fifth st. Repeat all the way around = 54 stitches.

Step 9.  Make 1 sc in the first 5 st, then 2 sc in the sixth st. Repeat all the way around = 63 stitches.


Step 10.  Make 1 sc in each st all way around, and repeat until you have the height you wish.
Mine is 11 cm high. Cut the yarn, and pull it through the loop. Secure the ends firmly. Choose whether or not you want the edge folded. Fill it up with rolled wash cloths, shampoos, body lotions or whatever you wish. Your big basket is done 😊


Rough shoe rack in trendy colours

This is a rough looking shoe rack made of construction wood and chicken wire.
I painted it in 4 of this year's colours, but it will be easier to make, if you choose just one 😊
What you need:
Materials:
Approx. 1 m chicken wire, 11x36 mm wood, cut into 12 pieces of 26 cm, and 12 pieces of 66 cm length, 30x48mm wood, cut into 8 pieces of 18 cm, and 4 pieces of 10 cm, durable paint in your favorite colour. (I used these: S1510-Y70R Deco pink - S4010-G70Y Green harmony - 2415-Y71R Delightful pink and S5010-R90B Kveldshimmel (Blue).) 8mm staples, thin 20mm nails, thin 45 mm wooden screws , wood glue, dowel pegs

Tools: Drill - saw - hammer - wire cutters - staple gun - drill bits - depth stop -  metal dowel points -  thin plastic foam

How to make it:

Step 1. Cut all the wood into the required sizes.
Step 2. Making the frames: Use the staple gun to staple the frame together. The short pieces goes in between the long ones. I used 2 staples in each joint, and on both sides of the frame, like this:

Step 3. Painting. You now have 6 frames, and 12 small pieces of wood. Paint them in colours you like. Be sure to use a strong durable paint. The frames need only be painted on one side, since we will combine them two and two later on. You probably need 2 layers of paint. Let each layer dry thoroughly before proceeding to step 4.
Step 4. I used some thin plastic foam under the frames in order not to harm the paint. Cut a piece of the chicken wire to fit your frame. Use the staple gun to staple it on the unpainted side of one of your frames. Use LOTS of staples in order to make it solid!
Step 5. Pick the other frame with the same colour, and have wooden glue along the unpainted side of it.
Step 6. Put the two frames together. (Glued side on top of chicken wire side.) Use some small thin nails to add a bit hold in addition to the glue.
Step 7. Repeat step 4-6 for the last 2 frames.
Step 8. Pick the 4 short (10cm) wooden pieces, put some glue on each, and screw them from above in the corners of one of the frames. NOTE! It's wise to drill a hole with a drill bit a little bit smaller than your screws, so the wood won't burst. One screw in each leg.
Step 9. Drill a hole in each corner, beside your screw. It should be the with of your dowel pegs, and the depth of half it's length. Use a suitable drill bit and depth stop for this. Put metal dowel points in the holes to mark the other part. Take one of the 18 cm wood pieces, and place in the corner. Press down, so the dowel point makes a mark. Drill a hole on the mark with the same depth as the other. Put a dowel peg in one of the holes, add a little glue around it, and press the pieces firmly together. Repeat this in all four corners.
Step 10. Put the next frame on top. Make sure the corners fit, and fasten it like in step 8.
Step 11. Repeat step 9.
Step 12. Repeat step 10.
Step 13. Put an extra layer of paint on the top shelf to hide your screws, and your shoe rack is done!😊


Sisal rope string lamp

Today I will show you my new string lamp. I think it looks cool, and it gives a warm beautiful light to my hallway 😊
What you need:
1 Beach ball in the size you want your lamp to be,
Sisal Rope (Mine is 4mm thick.),
Wood glue,
1 disposable plastic container to put the glue into,
1 pair of disposable  gloves,
Olive oil or similar
1 lamp cord set

 How to do it:

Step 1. Put the gloves on. It gets messy 😉.

Step 2.  Inflate the beach ball, and rub it in oil.

Step 3. Pour glue in the plastic container.

Step 4. Slide the rope through the glue as you go along, and wrap it around the beach ball.
It will look good if you change directions randomly all the time. Make sure the rope is soaked in glue.
NOTE: Leave a hole around the inflator of the ball, big enough for your hand to go through. (To change light bulbs.) And one on the opposite side that is a little smaller than the ring on your lamp socket. It can be hard to start with, to get the rope to avoid the holes, but no worries. Once you have a little more rope on it, it will be easier, and you may also slide the rope a little to the sides before you finish off, to adjust the holes.

Step 5. When you are satisfied with the amount of rope, cut the rope, and leave the lamp to dry for about 24 hours. Put it on a surface it won't stick to. For instance some plastic rubbed with oil.

Step 6. When the glue has fully dried up, deflate the beach ball, and install your lamp set.
Your new lamp is now ready to bring light to your life 😊😊


Heart for wine lovers

Hello again 😊

This is actually a copy of a gift I got from a friend a while back. My mom really wanted one too, so I made one for her. It's the perfect gift for any wine lover!
I hang it on my wine box container, but you may also hang it on the wall. Or.. If you make the rope shorter, you may hang it on a wine bottle.
This is what you need:
Some planed wood, a jigsaw, sanding paper, a drill, small and big paintbrush, white and copper paint, a pencil, a ruler, an eraser and some rope.

How to make it:
Step 1. Find a nice heart shape online that you like, print it, and cut out the heart. (This one is 17 cm across.)
Step 2. Put the heart onto your piece of wood, and draw around it.
Step 3. Use a jigsaw to cut along the lines.
Step 4. Use sanding paper to smooth the edges.
Step 5. Use a drill. and make 2 holes that are slightly bigger than the thickness of your rope.
Step 6. Paint the heart with white durable paint. You may need 2 layers, let them dry fully.
Step 7. Use a pencil to draw lines for the text to be straight. Then write the text and draw the border.
Step 8. Use copper paint and the small paintbrush to write on top of your pencil text and border. Let dry.
Step 9. Use the eraser to remove remains of your pencil marks.
Step 10. Put the rope through the holes, ant tie a knot on each end.
This is how it looks on my wine container 😉


Make your own incense

Hi again 😊

Today I will share my favorite recipe for homemade incense.
I love this scent of the far east. It's calming and relaxing,  and who doesn't like a home that smells nice?

What you need:
6-7 cloves
1 star anise
1 small piece of cinnamon bark (3-4 cm)
4 cardamom seeds
1 small piece of dried ginger
1 mortar

Just put all the bits in the mortar and crush them roughly.
Put it in your incense burner, light it, and enjoy 😍


Monday 30 January 2017

Rainbow coasters

Hi 😊
Today I will share with you how to make these really easy made rainbow colored coasters.

Some cotton yarn (150m per 50 gr bundle) in these colors: red, peach (or orange), yellow, green, turquoise (or blue) and violet. I just used some leftovers. Most colors will look great!
A crochet pin size 5.

Make sure you have 2 separate bundles of each color. They can be really small bundles, 'cause you don't need much yarn. For all steps below: Use double yarn.

Step 1. Make a magic ring with the violet yarn. If you don't know how, there is a good tutorial here.

Step 2. Make 6 sc in the ring, and tighten it.

Step 3. Make 2 sc in each stitch = 12 stitches.

Step 4. Change to  turquoise (or blue) yarn (see tip below), and do 1 sc in the first st, then 2 in the second, and so on around the ring = 18 stitches.

Step 5. Repeat step 4 = 27 stitches.

Step 6. Change to green yarn, and make 1 sc in the first 2 st, then 2 sc in the third st. Repeat all the way around = 36 stitches.

Step 7. Change to yellow yarn, and make 1 sc in the first 3 st, then 2 sc in the forth st. Repeat all the way around = 45 stitches.

Step 8. Change to peach (or orange) yarn, and crochet as in step 7. = 56 stitches.

Step 9. Change to red yarn, and make 1 sc in the first 4 st, then 2 sc in the fifth st. Repeat all the way around = 67 stitches.

Step 10. Cut the yarn, and pull it through the loop. Secure the ends tightly, and VOILA! You have made a rainbow coaster.😊


Tip for color change: If you are like me, and don't like all the loose ends to secure. Do like this:
Cut the "old" color yarn, leaving 5-6 cm ends. Start the "new" color with the same ends, and lay them together on top of the stitches you are going to crochet. Then crochet around the ends as you go along, and the ends will be made into your coaster. This way you only have to secure the violet end in the middle, and the red one in the end.
Like this:


Tuesday 10 January 2017

Welcome to my inspiration blog :)

I have been thinking about this for a while.. Making a blog for all you people out there, who are like me.. Who am I, you may ask.. Well, let me introduce myself 😊   I love crafting and DIY! I love the idea that I made something! With my own two hands!😉 However, (and this is what we have in common) I don't have a lot of patience... So.. In this blog I will show you lots of different things that are easy and quick to make. I use many different materials and techniques. You will find everything from paper crafts till easy made furniture here.
There are a lot of creative bloggers that are very talented, and make extraordinary things. I am amazed and impressed in so many ways, but I tend to think that those projects are not for me.. I don't want to spend a week making a birthday card, or months knitting a sweater. I want to do quick and easy, but still pretty, and home made. Lots of what I make end up as gifts for friends and family, and some are kept in our home. All projects posted here will be things I have tried out myself.. Some inspired by others, and some where I have come up with the idea myself. I am no expert, so basically: If I can do it, so can you! Hope you will like my blog, and follow me here. I will try to share my projects daily.