Monday, 26 March 2018

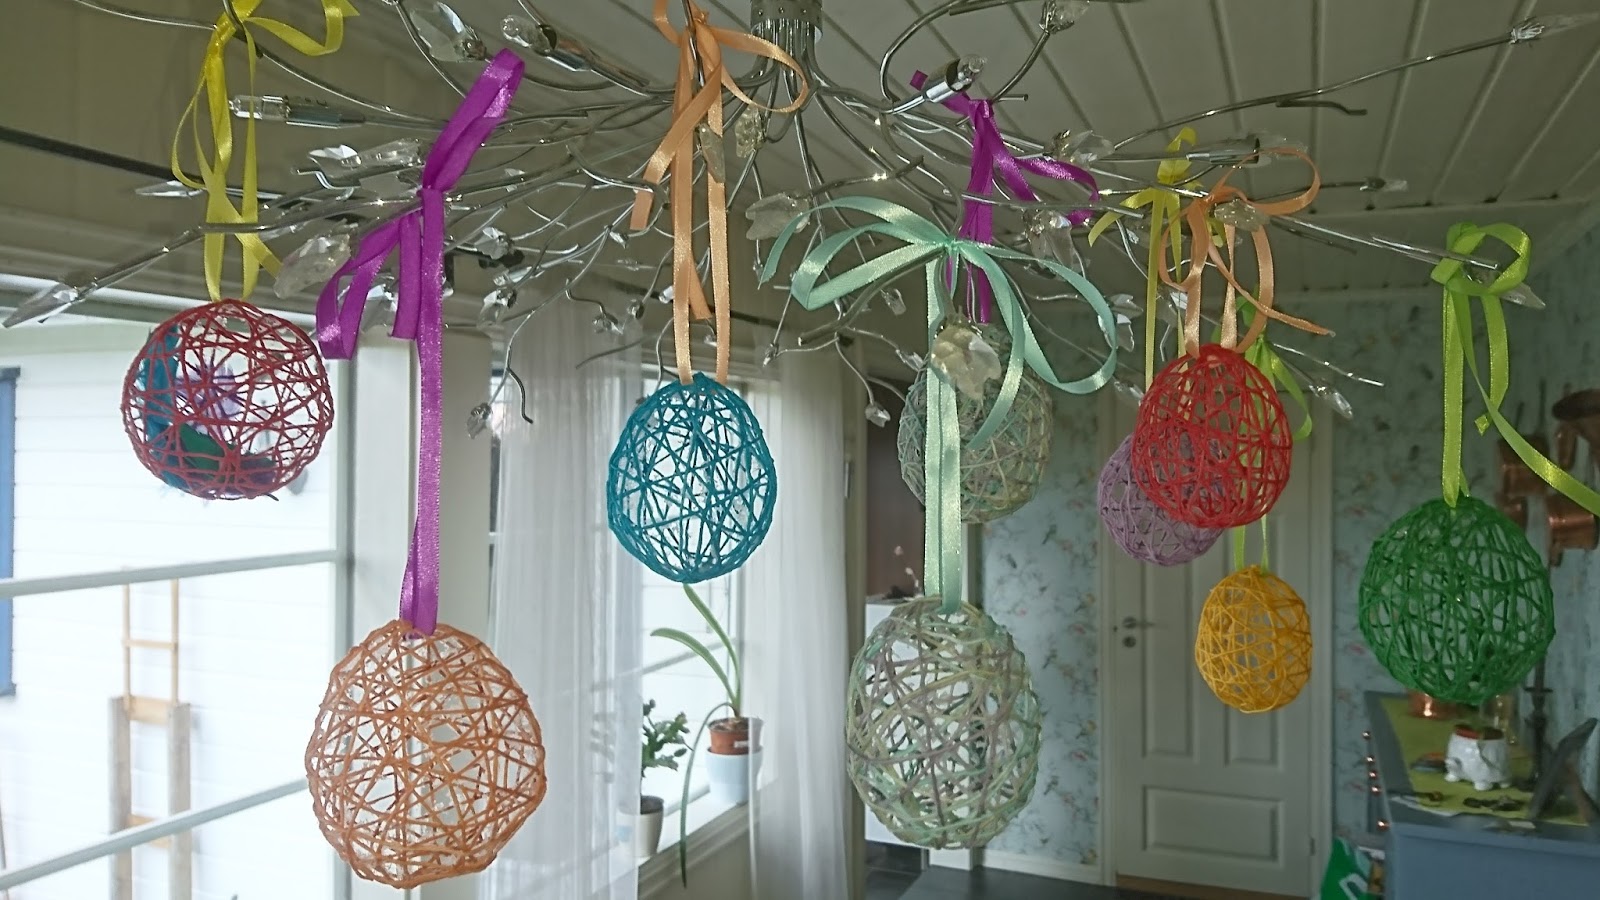
Decorative, fun to make, Easter eggs


These cute Easter eggs are really fun and simple to make. Why not host a workshop with your friends or family, and make lots of them?

Here is what you need: Small balloons (I used water balloons), cotton yarn, PVA glue, or other glue that will turn transparent when dry (I used ordinary wood glue), disposable gloves, a plastic cover for your table, some nice coloured ribbons 😊😊

This is how you do it:  
1. Inflate the balloon, and tie a knot in the end. 
2. Pour some glue into a small container. 
3.Dip the cotton yarn in the glue, inch by inch while you gently lay it around the balloon. Turn around and around to make the pattern random. It all may seem quite icky... But no worries. They will look great in the end. 


4. When you are satisfied with the amount of yarn, lay the balloon on a plastic surface to dry.
5. When it is fully dried, and the yarn has hardened, pop the balloon, and remove it.
6. If you have uneven edges, just pluck off the small bits of glue. (A nail file may also be useful.)
7. Select a nice coloured ribbon that goes with you choice of yarn. Tie it on top, and make a loop with a bow on it.. Your cute Easter egg is now finished, and ready to decorate your home 💜 
8. If you wish, you may fill them with feathers, but I think they look just as nice without.


 Happy Easter!

Friday, 23 March 2018

Beautiful knitted Easter eggs


These eggs are inspired by the Christmas bulbs of Arne and Carlos.. https://www.ravelry.com/patterns/library/julekuler

I made a few adjustments, and got them egg shaped..

The green egg is made with the increases that are on the pattern.. But if you want a seamless egg, you need to randomly increase and decrease the stitches around the egg 😏

This is what you need: Some scrap yarn that fits knitting pins 2,5 mm or 3mm.  5 Knitting pins size 2 mm.. Yes, to make it tighter.. LOL. Stuffing to fill the egg. I save my cut off ends of yarn from everything I make, and use those to fill it.. You may also use cotton or other stuffing..  A needle to sew the ends, and a marker to help you follow the pattern. Also cute ribbons to hang them ..

Step 1: Cast on 3 stitches to each of your 4 knitting pins.. Then follow this pattern to increase and decrease your number of stitches :
 The green/blue egg is made of a semi coloured cotton yarn and will get it's pattern from the yarn itself.. It will be useful to use a marker to see where your round begins, to help you count 😊

Step 2: When you start decreasing the stitches, turn the egg inside out, and sew the bottom of it tightly..
Step 3: When you have apxm 32 stitches, fill your egg with some stuffing. ( See above)
Then continue to the end, and cast off.
Step 4: Sew the top.
Step 5: Find a nice ribbon that fits your colours, and use the needle to pull it through the top of the egg. Make a nice bow, and a loop for hanging it..

The green egg is made of thin wool yarn, following this pattern, with a very pale pink as decoration:
Remember to secure the loose ends on the inside of the egg before you stuff it.

This is the pattern for the white and pink egg.. I made this with alpaca yarn. So as you can see, basically any thin yarn will make a pretty egg. Look through your leftovers, and choose some nice colours. Follow instructions as for the green one 😊
Hopefully you will have time to make some of these eggs before Easter. Good Luck!


Friday, 16 March 2018

Need to have cat hat


These super easy cute cat hats are made in a couple of hours.. Large knitting pins and thick yarn is the reason. I made them with acrylic yarn that has a reflecting ribbon in it. It is great for the dark season, because you will not only be warm on your ears, but also visible along the roads 😄 They can of course be made of other yarn qualities that will fit the knitting pins. This size will fit most adults, since it is quite elastic and flexible. If you want smaller sizes, cast on fewer stitches, but make sure they are dividable with 5.

What you need:

Apxm 75 grams of yarn that fits 8 mm knitting pins. (Mine is 50 m per 50 grams.)
1 circular knitting pin, size 8mm, and 40 cm long. (Or a set of stocking pins size 8.)
1 thick sowing needle to sow the ends and the ears.

How to make them:

1. Cast on 60 stitches.

2.  Knit around: *Knit 3, pearl 2* Repeat from * to * 12 times.

3. Repeat step 2 apxm 33 times, or until it has the length you want.

4. Cast off. Sow the hat together along the top.

5. Sow a diagonal seam on each side, from the top seam, and down to the side. Start about 9 cm from the corner, and end about 9 cm down on the side.

Meeeeeaaaaoooo... Your purrfect cat hat is done 😻

Monday, 5 March 2018

Felted seating pads for cold cat lovers


I have accepted a challenge to make some things for our local cat shelter. They are in need of things to sell on their annual market. Therefore there will be some cat related things coming up here on my blog. First things I made were these felted seating pads. They are very quick to make, since you use thick yarn, and a big crochet hook. Here in Norway it is very popular to bring these out on skiing trips or other trips out in nature. They will keep you nice and warm, if you want to sit out in the cold seasons. I have crocheted them in wool yarn, and then felted on the appliquetions with loose wool. When you are felting things in the washing machine, the results are quite unpredictable, but that's half the fun I think. Even so, you can not count on getting the same measurements on your pad, as me. It all depends on what machine you have, what program you use, and how much you put into the machine.

What you need

Apxm 150 grams of wool yarn. (It is important that it is 100 % wool, and that it is NOT superwash, otherwise they will not felt. It should fit crochet hook 8mm, mine is 55 meters per 50 gram bundle.) 1 crochet hook 8 mm, some loose wool (5-10 grams) of  a different colour than the yarn, a needle to secure loose ends,  a felting needle and some latex foam, or similar, to have under your pad when felting on the wool.

How to do it:


1. Make a magic ring. If you don't know how, there's a good tutorial here. Make 5 sc in the ring, and tighten it.
2.Make 2 sc in each stitch = 10 stitches
3.  Make 1 sc in the first st, then 2 in the second, and so on around the ring = 15 stitches.
4. Make 1 sc in the first 2 st, then 2 sc in the third st. Repeat all the way around = 20 stitches
5. Make 1 sc in the first 3 st, then 2 sc in the forth st. Repeat all the way around = 25 stitches
6. Repeat like this until you have 5 x 25 st around = 125 st. Cut the thread and pull it through the loop. Secure the ends.. This will make a pentagon shaped seating pad. If you want a round one, you should move the extra stitches for each round. Place them randomly around.. Use a marker to show the beginning of the round to help you increase enough stitches.

7. Now choose a pattern you like.. For this blue one, I went with a kitten's face.. Then use your loose wool, and the felting needle, and foam underneath, to pin it into your pad.. You need to pin a lot of times in order to make it stick..  Put your work into the washing machine.. I used a sportswear programme and 40 degrees for this one, your machine may be different.. When I took it out of the machine, the whiskers of the cat were not the way I wanted them to be, so I used the felting needle again, and washed it once more on 30 degrees.. Remember to use a detergent that is made for wool 😃
8. After washing it the 2nd time, I noticed it had become a bit smaller, but if you pull it a bit when it's wet, you can increase the size..
After all, I'm quite happy with the result..

Tuesday, 14 November 2017

Cute hippie style hairband with flowers


We were invited to a hippie party, and I wanted to make a hairband to wear with my costume. However, I think it turned out looking really good, so I use it on other occasions as well. It has a touch of summer to it, since it is so colourful. I used double yarn to crochet it. The white colour is consistent the whole time, and the second colour changes.

What you need: Some leftover cotton yarn, crochet hooks size 5mm and 2,5mm, 3 small buttons, apx 10 cm elastics. A needle and some sowing thread.

How you make it.


1. With double yarn (white and green), and crochet hook size 5: crochet 7 chain stitches, *turn, do 1 sc in the 2nd st from the hook, and continue with 5 more sc, 1 ch.* repeat from * to * one time.

2. Turn. Do 1 sc in the 1st sc, 2 sc in the 2nd sc, 1 sc in the following 2 sc, 2 sc in the next one, and 1 sc in the last. 1ch, turn.

3. * Do 1 sc in the second st from the hook (the first sc), 1 sc in each st throughout the row (= 8 sc), 1ch, turn.* Repeat from * to * 11 times. The first 4 rows with green and white yarn, the last 7 rows with orange and white yarn. (See colour change tip at the end.)

4. With white and lilac yarn: Do 1 sc in the 1st sc, 2 sc in the 2nd sc, 1 sc in the following 4 sc, 2 sc in the next one, and 1 sc in the last. 1ch, turn.

5. * Do 1 sc in the second st from the hook (the first sc), 1 sc in each st throughout the row (= 10 sc), 1ch, turn.* Repeat from * to * 42 times. The first 6 rows with lilac and white yarn, then 7 rows with turquoise and white, 14 rows with yellow and white, 7 rows with turquoise and white, 7 rows with lilac and white, 1 row with orange and white. (See colour change tip at the end.)

6. Do 1 sc in the second st from the hook, then skip one, and do 1 sc in the next 5, skip one, and do 1 sc in the last st on the row, 1 ch, turn.

7. * Do 1 sc in the second st from the hook (the first sc), 1 sc in each st throughout the row (= 8 sc), 1ch, turn.* Repeat from * to * 10 times.The first 5 rows with orange and white, then 5 rows with green and white.

8.  Do 1 sc in the second st from the hook, then skip one, and do 1 sc in the next 3, skip one, and do 1 sc in the last st on the row, 1 ch, turn. Do 1 sc in the second st from the hook (the first sc), 1 sc in each st throughout the row (= 6 sc). Cut the yarn, and pull it through the loop. Secure all ends.

9. Measure your head, and compare it to the hair band. Cut some elastics that fits your measurements, and sow it on the band, to attach the ends.


How to make the flowers:


Use single yarn and crochet hook size 2,5 mm.

1. Do 5 ch st, and 1 sl st to bind them together in a ring.

2.  In the ring, do *3ch, 3dc, 3ch, 1 sl st* repeat from * to * 5 times. Cut the yarn, and pull it through the loop. Secure the ends by weaving them in on the backside of the flower.

Make 3 of them, or more if you want.. Sow them onto the hair band with the buttons in the middle.




Monday, 13 November 2017

Flower power hippie jeans (and sandals)


As I mentioned, we were attending a hippie costume party earlier. You already saw the t-shirt I made for my boyfriend, and here's how to make the jeans 😉

What you need:

1 pair of old jeans, preferably tight fit, some fabrics with flowers or other colourful fabric. Maybe some old curtains? A sowing machine ( If you are not VERY good at sowing by hand.. LOL..), thread that matches the fabric, blue in this case.. , scissors, measuring tape, and something to mark the fabric with. I used an ordinary soft pencil, since I am not good at this..😉😉

How you do it

Split the outer seam on each leg of the jeans up tho the knee. For my jeans it was 44 cm. Then cut out two triangles of the flowery fabric that has sides that match the length of your split. For me: 44 cm. Add a couple of extra centimeters on all three sides for seams. Then use pins to attach the fabric in your split opening. Remember to match right side and wrong side. Use the sowing machine to sow your triangles on, and fold them in the bottom. Easy peasy new hippie jeans!

I made shoes as well! 

Shoes were a problem for both of us.. But then I remembered that hippies were known to use sandals. I bought 2 pairs of dead cheap flip flops, and some plastic flowers that I think was made for scrapbooking or something.. I glued the flowers on with hot glue. Maybe not the most inventive of ideas, but it worked.. After all we did not want to spend tons of money on something we were going to use 1 day. So.. If you ever get invited to a hippie party. I hope you got some inspiration here. 😘


Wednesday, 8 November 2017

Painted hippie T-shirt


Last month we were invited to a hippie costume party. We needed costumes! I was lucky to be able to borrow a dress from a colleague, but what about my boyfriend's costume? I made a pretty cool T-shirt and some hippie jeans for him. Here's how I made the T-shirt.

What you need


1 plain white T-shirt ( I bought the cheapest one I could get.) Some paint in happy colours. I used different kind of paint for this. I tend to buy test colour cans from my DIY store, so some of them are interior paint, and some exterior, but it worked out really well, I think. A thin paintbrush, rubber band, a pencil, and a big bowl to draw a ring to help you with the pattern. 1 piece of wood or styrofoam, or cardboard to put inside the t-shirt to keep it straight, and to prevent the paint from bleeding into the back side.


How you do it

Put the piece of wood/styrofoam/cardboard inside the t-shirt, and tighten it by using a rubber band on the backside, like this:

Then use a big bowl (Mine is 26 cm in diameter.) and a pencil, and draw a ring in the middle of the front of the t-shirt. Use the pencil to draw a spiral towards the center of the ring.
Then you can start painting the first colour. I used quick, short brush strokes towards the drawn line. Started in the middle, and worked my way outwards. When the first colour is dry, you can do the second, then the third and the fourth, until you have filled the circle with colour. I chose to paint in this sequence: Dark Blue, Green, Red, Yellow, which made the yellow and the red most visible, and I wanted the brightest colours to show the most.
Make sure your paint cover the pencil marks!
When all the colours have dried up, you may write the text. I used white paint for that, and painted by free hand. But I'm sure you may find text online that is usable as a template, if you prefer that. I just thought that the hippies were all happy and non-material, and made things themselves.. Hehe 😀